Posts
- Rust async tasks, semaphores, timeouts and more
- Streamable log in browser
- Rust errors explained simply
- I don't trust Gemini, but ...
- Hibernating to disk
- Django and manual data prefetch
- Django, window functions and paginator
- How I discovered MPV
- Pake - wrapping websites
- Accordion with animated height
- Nginx: HTTP and HTTPS on a single port
- NeoMutt: new Thunderbird
- How I solved the dilemma of personal notes
- Django model constraints
- Simple keyboard udev rule
- Kitchen LEDs and Home Assistant
- Home Assistant Nginx proxy server
- Rust and it's ability to insert/replace string into another string onto specific position
- Python HTML table parser without dependencies
- Python defaultdict with data
Kitchen LEDs and Home Assistant
Let's say you have a new kitchen setup in your home and you would like to mount some LEDs - let's say whole RGB LED strip which you would like to control with Home Assistant just like your ordinary (foe example) IKEA Tradfri bulb. It's totally possible.
All the code including scripts is available in my repository.
How to
LED strip can be easily controlled with a micro controller such as Raspberry Pi or NodeMCU. I went for the second option since it's much more "micro" and has less power consumption which will be a must for my further projects.
The NodeMCU can be programmed in C++ but also in Micro Python which is much simpler and since I'm a Python developer that was the choice.
Flashing Micro Python
Downloading Micro Python from the official website and flashing it is quite easy. But in our case we will need to assemble our own firmware version enriched of mqtt module. This module give you the possibility to communicate with MQTT - even asynchronously. To do so follow step 1 in the repository README.
Requirements
Hardware
- ESP8266 chip
- step down module (i.e. LM2596)
- NPN transistors which is open at 3.3V
- wires
- box
- magnets
- shrinking tubes
- LED strip (12V)
Software
- python
- compiled firmware with MQTT support
- working MQTT integrated into Home Assistant
- esptool
- adafruit-ampy
- rshell
Circuit
Once you figure out which components are needed the circuit itself is quite easy to assembly. Tne scheme is this:

Transistors and LEDs
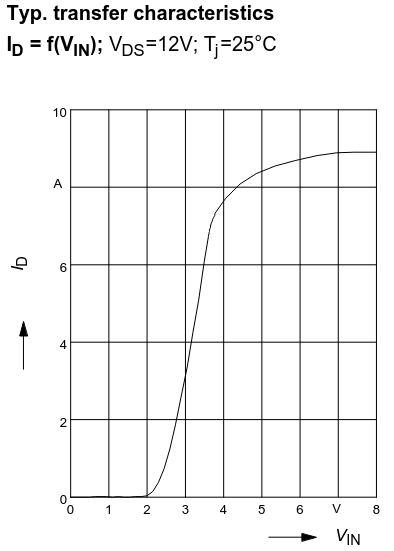
The most important part is the NPN transistors. They turn on/off at certain voltage. This voltage is usually small, around 3-5 vots. Since we use NodeMCU in this project which output is max 3.3V the on/off threshold is very crucial in this case.
LED strip has certain amount of LEDs on 1 meter. Those consume some current. In my case I have:
- 3 meters long LED strip
- 60 LEDs on 1 meter (20 segments)
- each LED segment (3 LEDs) drains 60 mA
- thus 1 meter drains 1.2A per meter
- 3 meters long LED strip drains 3.6A
- each color drains 1.2A
My transistors (BTS 117) need to be able to deliver 1.2A or more under 3.3V. The technical sheet to my transistors says following:
 I know my transistors can deliver up to 4A under 3.3V. They qualify.
Code
Whole application code is based on Micro Python with help of MQTT, uasyncio and ujson.
Whole application is not complicated at all - it just parses incoming data on MQTT topic and then operates those 3 transistors. Brief breakdown:
- connect to wifi
- connect to MQTT
- subscribe to the given topic
- parse incoming data and process it
Home Assistant
Message scheme is
given
by Home Assistant. It uses json schema and can be configured
like this in configuration.yaml file.
mqtt:
  light:
    - schema: json
      name: Kitchen LED
      unique_id: "kitchen.bottom_led"
      command_topic: "home/kitchen/bottom_led/in"
      brightness: true
      color_mode: true
      supported_color_modes: ["rgb", "white"]
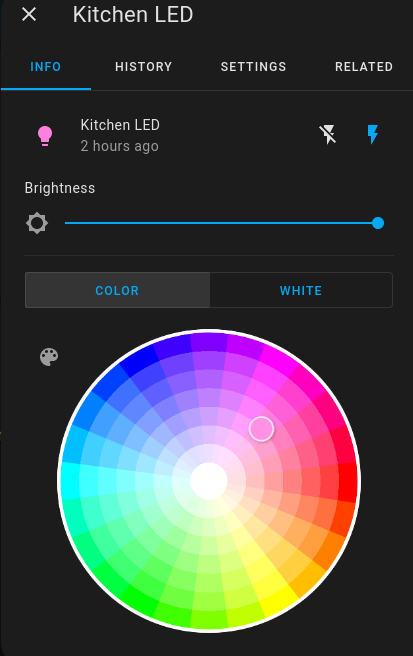
This configuration adds a new light entity under MQTT integration which can handle RGB and white (of course once it's RGB). The chosen MQTT topic must correspond with the one Python program listens to.

Box
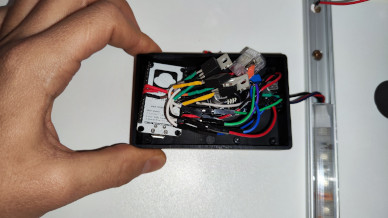
Whole setup can squeeze into a relatively small box.


Debugging
Debugging hardware is not easy since it's not that easy to look
inside what's actually going on. The program in my repository comes
with simple debugging logic - a log file which is truncated every
time MCU starts up. This file can be easily obtained from the
MCU - see/use scripts/get_log.sh script.
Another debugging step can be done on the side of MQTT. I do use Mosqitto which with the following setup gives quite verbose output to stdout.
connection_messages true
log_type all
log_dest stdout
One thing that Mosquitto cannot do is to print transfered messages to stdout. Although this can done by Mosquitto MQTT client (which comes with the server) just by listening to the topic
$ mosquitto_sub -v -t "home/kitchen/bottom_led/in"